Friday, April 25, 2014

Usage Tracking Implementation in 11g


Hi Freinds,
                         Today we will discuss the usage tracking implementation in OBIEE 11g.

A usual requirement is to enable usage tracking to gather statistics about usage of OBIEE, things like performance, which Dashboards/Reports are being utilized, who is logging in, etc. Out of the box, Oracle includes a robust usage tracking capability with OBIEE, and in fact includes a sample RPD with the Usage Tracking Subject area during install.

There are three main components:


  • Changes/configuration in the RPD
  • Configuration in Enterprise Manager
  • SQL to run to setup Usage Tracking schema.

Continue on to read the steps to enable Usage Tracking


Schema Setup:

  • Using TOAD (or SQLPLUS) connect to the BIPLATFORM schema (DEV_BIPLATFORM, or whatever you called it during installation) on the database which you configured for this OBIEE 11g instance.
  • Run the four Oracle scripts to setup Usage Tracking (found in SQL_Server_Time folder, where the sample RPD is included, see top of post):
    • Oracle_create_nQ_Calendar.sql
    • Oracle_create_nQ_Clock.sql
    • Oracle_nQ_Calendar.sql
    • Oracle_nQ_Clock.sql
  • Remember to Commit!


Run DDL and DML scripts to create and populate the following tables in DEV_BIPLATFORM schema .
(/mwh/instances/instance1/bifoundation/OracleBIServerComponent/coreapplication_obis1/schema)

S_NQ_ACCT
S_ETL_DAY
S_ETL_TIME_DAY
NQ_LOGIN_GROUP (VIEW)


RPD Changes:

The sample RPD can be found at:

{OBIEE_11G_Instance}/bifoundation/OracleBIServerComponent/coreapplication_obis1/sample/usagetracking


 You will need to copy the Physical, BMM, and Presentation components from the sample UsageTracking.rpd to your development/test/production RPD. Note that I had to make a few changes to the included RPD. If the UsageTracking subject area is not as OBIEE is expecting, then OBIEE will fail to update the table with usage details, and give an error message in the nqserver.log.

  • Open the RPD with the Admin Tool.
  • Expand the S_NQ_ACCT table in the physical layer and check that all of the following fields exist with the correct data type.

  • Rename RUNAS_USER_NAME to IMPERSONATOR_USER_NAME
  • Add the following missing fields (right click on S_NQ_ACCT, select New Object -> Physical Column…)
    • ID
      • Type: VARCHAR
      • Length: 50
      • Nullable: Unchecked
    • QUERY_BLOB
      • Type: LONGVARCHAR
      • Length: 4000
      • Nullable: Checked
    • QUERY_KEY
      • Type: VARCHAR
      • Length: 128
      • Nullable: Checked
  • Below is a list of all of the required fields, data type, length, and nullable flag:
Field NameData TypeLengthNullable?
CACHE_IND_FLGCHAR1No
COMPILE_TIME_SECDOUBLE
Yes
CUM_DB_TIME_SECDOUBLE
Yes
CUM_NUM_DB_ROWDOUBLE
Yes
END_DTDATETIME
Yes
END_HOUR_MINCHAR5Yes
END_TSDATETIME
Yes
ERROR_TEXTVARCHAR250Yes
IDVARCHAR50No
IMPERSONATOR_USER_NAMEVARCHAR128Yes
NODE_IDVARCHAR15Yes
NUM_CACHE_HITSDOUBLE
Yes
NUM_CACHE_INSERTEDDOUBLE
Yes
NUM_DB_QUERYDOUBLE
Yes
PRESENTATION_NAMEVARCHAR128Yes
QUERY_BLOBLONGVARCHAR4000Yes
QUERY_KEYVARCHAR128Yes
QUERY_SRC_CDVARCHAR30Yes
QUERY_TEXTVARCHAR1024Yes
REPOSITORY_NAMEVARCHAR128Yes
ROW_COUNTDOUBLE
Yes
SAW_DASHBOARDVARCHAR150Yes
SAW_DASHBOARD_PGVARCHAR150Yes
SAW_SRC_PATHVARCHAR250Yes
START_DTDATETIME
Yes
START_HOUR_MINCHAR5Yes
START_TSDATETIME
Yes
SUBJECT_AREA_NAMEVARCHAR128Yes
SUCCESS_FLGDOUBLE
Yes
TOTAL_TIME_SECDOUBLE
Yes
USER_NAMEVARCHAR128Yes
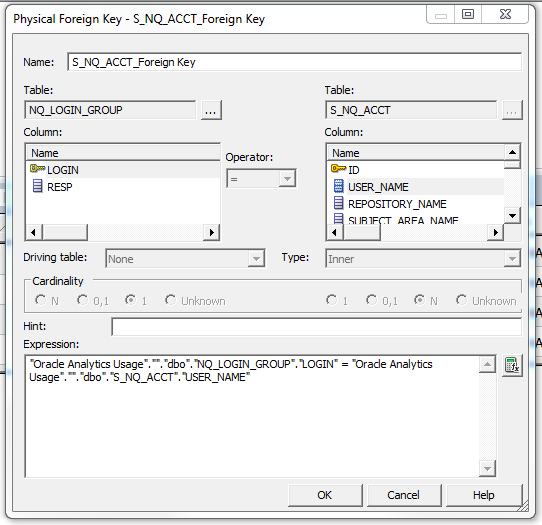
  • The join between S_NQ_ACCT and NQ_LOGIN_GROUP is broken. Select both tables, right click and choose Phyiscal Diagram -> Selcted Object(s) Only.
  • Select the red arrow, and click Delete to remove the broken join.

  • Now click on the new join icon

  • Draw a new join from S_NQ_ACCT to NQ_LOGIN_GROUP and change the join condition to:
  • "OBI Usage Tracking"."dbo"."NQ_LOGIN_GROUP"."LOGIN" = "OBI Usage Tracking"."dbo"."S_NQ_ACCT"."USER_NAME"

  • Click Ok.
  • Close the physical diagram window.
  • Now right click on the table S_NQ_ACCT and select properties.

  • Select the Keys tab.

  • If there is no key defined, enter ID in Key name and select the ID field from the drop down in the Columns field.

  • Click Ok.
  • Don't forget to setup proper Connection Pool information for both connection pools:
    • Usage Tracking Connection Pool
    • Usage Tracking Writer Connection Pool


Enterprise Manager Configuration:

The following outlines the steps needed within Enterprise Manager to configure and start Usage Tracking.
  • Navigate to the Enterprise Manager (EM) of the host you are deploying to.

  • Login with the admin credentials (biadmin/oracle01)
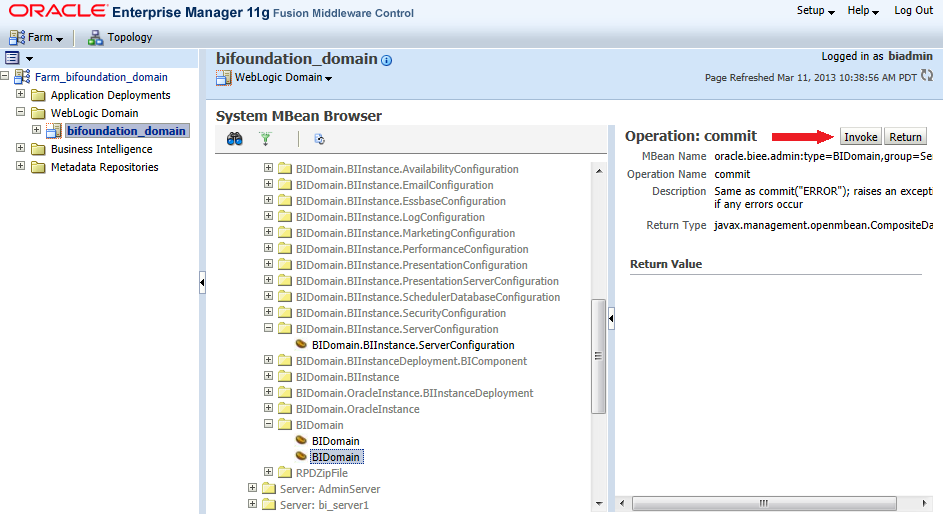
  • Navigate to the Mbeans by expanding WebLogic Domain, selecting bifoundation_domain, and then from the drop down chooses System MBean Browser.

  • Lock the Mbeans by navigating to:
    • Application Defined MBeans->oracle.biee.admin->Domain: bifoundation_domain->BIDomain->BIDomain (the second one of the two)
  • Click on the Operations tab.
  • Click on lock.

  • Click on Invoke.

  • Click on Return.
  • Navigate to the Usage Tracking mbeans:
    • Application Defined MBeans->oracle.biee.admin->Domain: bifoundation_domain->BIDomain.BIInstance.ServerConfiguration->BIDomain.BIInstance.ServerConfiguration
  • Click on Attributes.
  • Set the following Attributes:
    • UsageTrackingConnectionPool = "Oracle Analytics Usage"."Usage Tracking Writer Connection Pool"
    • UsageTrackingEnabled = True
    • UsageTrackingPhysicalTableName = "Oracle Analytics Usage"."dbo"."S_NQ_ACCT"
  • Click on Apply.
  • Commit the MBeans by navigating to:
    • Application Defined MBeans->oracle.biee.admin->Domain: bifoundation_domain->BIDomain->BIDomain
  • Click on the Operations tab.
  • Click on commit (the first option).

  • Click on Invoke.

  • Click on Return.
  • Navigate back to the main EM page.
  • Under Business Intelligence, select coreapplicaiton.

  • Click on the Overview tab, if you are not already there.
  • Click on the Restart button.

  • When prompted to restart all components, click on Yes.

  • The process will take a few moments, but will let you know once it has completed.


 Thanks
Saleem Syed (SS)


Tuesday, April 22, 2014

Oracle Business Intelligence Mobile App Designer


Source :   http://docs.oracle.com/cd/E52471_01/bi.1111/e48576/toc.htm


Installation Notes
11g Release 1 (11.1.1.7.1)
E48576-03
February 2014
This document describes how to install the Oracle Business Intelligence Mobile App Designer. It includes the following sections:

1 Overview

To install the Oracle Business Intelligence Mobile App Designer, download and apply the required patches into an existing Oracle Business Intelligence Enterprise Edition environment. Complete the postinstallation tasks to enable the BI Mobile App Designer components in your environment.

2 Prerequisites

Ensure that you meet the following requirements before you install or deinstall the patch. Download patches from My Oracle Support at https://support.oracle.com.
  • Oracle Business Intelligence Enterprise Edition version 11.1.1.7.131017 or later.
    If you are not already on Oracle Business Intelligence Enterprise Edition version 11.1.1.7.131017, apply the latest patch available. Currently, that is Patch 17886497: Oracle Business Intelligence Enterprise Edition Suite Bundle Patch 11.1.1.7.1401114.
    Customers who are upgrading from 11.1.1.6.x or customers who have already performed an in-place upgrade to the latest patch level, ensure that you enable the JBIPS features as described in "Enabling JBIPS Features" in Oracle Fusion Middleware Patching Guide.
  • Download Oracle BI Mobile App Designer patch 17220944 from My Oracle Support.

3 Installing Oracle BI Mobile App Designer

Complete the following tasks to install Oracle BI Mobile App Designer:

3.1 Task 1: Stop the Oracle BIEE System

Stop all of the following components in the order shown:
  1. BI System components.
    • On Unix:
      Navigate to
      prod_mwhome/instances/<instance>/bin
      Enter the following at the command prompt:
      ./opmnctl stopall
    • On Windows:
      Navigate to
      prod_mwhome\instances\<instance>\bin
      Enter the following at the command prompt:
      opmnctl stopall
  2. Weblogic Managed Servers:
    • On Unix:
      Navigate to
      prod_mwhome/user_projects/domains/<domain_name>/bin
      Enter the following at the command prompt:
      ./stopManagedWebLogic.sh bi_server1
    • On Windows:
      Navigate to
      prod_mwhome\user_projects\domains\<domain_name>\bin
      Enter the following at the command prompt:
      stopManagedWebLogic.cmd bi_server1
  3. WebLogic Administration Server
    • On Unix:
      Navigate to
      prod_mwhome/user_projects/domains/<domain_name>/bin
      Enter the following at the command prompt:
      ./stopWebLogic.sh
    • On Windows:
      Navigate to
      prod_mwhome\user_projects\domains\<domain_name>\bin
      Enter the following at the command prompt:
      stopWebLogic.cmd -stop

3.2 Task 2: Apply Oracle BI Mobile App Designer OPatch

Note:
Standard Oracle Fusion Middleware (FMW) customers must apply this patch to:
-MW_HOME /OracleBI1 (Oracle BI Home)
To apply the OPatch:
  1. Unzip the patch zip file into the Oracle BI Home directory.
    For example:
    • On Unix you might extract patch 17220944 to
      prod_mwhome/Oracle_BI1/17220944
    • On Windows you might extract patch 17220944 to
      c:\prod_mwhome\Oracle_BI1\17220944
  2. Set your current directory to the directory where the patch is located.
    For example:
    • On UNIX: If the Oracle BI Home directory is prod_mwhome/Oracle_BI1, then enter the following:
      $ cd prod_mwhome/Oracle_BI1
    • On Windows: If the Oracle BI Home directory is C:\prod_mwhome\Oracle_BI1, then enter the following:
      cd c:\prod_mwhome\Oracle_BI1
  3. At the command prompt, set the ORACLE_HOME, PATH, and JAVA_HOME environment variables as appropriate for the operating system.
    For example:
    • On Unix if you are using a command shell derived from the C shell, then set the environment variables by entering the following:
      setenv ORACLE_HOME $PWD
      setenv PATH $ORACLE_HOME/bin:$PATH
      setenv JAVA_HOME $ORACLE_HOME/jdk
      setenv PATH $JAVA_HOME/bin:$PATH
      setenv PATH $ORACLE_HOME/OPatch:$PATH
      
    • On Windows: If the Oracle BI Home directory is C:\prod_mwhome\Oracle_BI1, then set the environment variables by entering the following:
      set ORACLE_HOME=C:\prod_mwhome\Oracle_BI1
      set PATH=%ORACLE_HOME%\bin;%PATH%
      set JAVA_HOME=%ORACLE_HOME%\jdk
      set PATH=%JAVA_HOME%\bin;%PATH%
      set PATH=%ORACLE_HOME%\OPatch;%PATH%
      
  4. At the command prompt, change directory to the extracted patch directory.
    For example:
    • On Unix: If you extracted patch 17220944 into
      prod_mwhome/Oracle_BI1/17220944
      then enter the following:
      $ cd prod_mwhome/Oracle_BI1/17220944
    • On Windows: If you extracted patch 17220944 into
      C:\prod_mwhome\Oracle_BI1\17220944
      then enter the following:
      cd C:\prod_mwhome\Oracle_BI1\17220944
  5. Apply the patch.
    Use the following command to apply the patch to the ORACLE_HOME:
    opatch apply
    When OPatch starts, it validates the patch to ensure that there are no conflicts with the software already installed in the ORACLE_HOME.
    OPatch categorizes two types of conflicts:
    • Conflicts with a patch already applied to the ORACLE_HOME.
      In this case, stop the patch installation, and contact Oracle Support Services.
    • Conflicts with a subset patch already applied to the ORACLE_HOME.
      In this case, continue the install as the new patch contains all the fixes from the existing patch in the ORACLE_HOME.

4 Postinstallation Steps

After applying the OPatch, perform these steps:

4.1 Task 1: Deploy Oracle BI Mobile App Designer

Run the WebLogic Configuration Assistant to deploy Oracle BI Mobile App Designer. This step is required only the first time you install the patch.
Start the Oracle Business Intelligence Configuration Assistant from the bin directory in the ORACLE_HOME (default folder name is Oracle_BI1), based on the operating system.
For example:
  • On Unix: Go to prod_mwhome/Oracle_BI1/common/bin
    and run
    ./config.sh
  • On Windows: Go to prod_mwhome\Oracle_BI1\common\bin
    and run
    config.cmd
Enter the following for the Configuration Assistant screens:
Note:
The bimad Web application must be deployed to the same target as the Analytics web application. The default target is "bi_cluster".
  1. On the Welcome screen:
    Select Extend an existing WebLogic domain.
  2. On the Select a WebLogic Domain Directory screen:
    Choose the domain to extend, for example: bifoundation_domain
  3. On the Select Extension Source screen:
    Choose Extend my domain using an existing extension template
  4. Click Browse to locate and select <mw_home>/Oracle_BI1/common/templates/applications/oracle.bimad_template_11.1.1.jar
    for the Template Location.
  5. On the Configure JDBC Data Sources screen:
    Click Next.
  6. On the Test JDBC Data Sources screen:
    Click Next.
  7. On the Configure JDBC Component Schema screen:
    Click Next.
  8. On the Test JDBC Component Schema screen:
    Click Next.
  9. On the Select Optional Configuration screen:
    Click Next.
  10. On the Configuration Summary screen:
    Click Extend.
  11. On the Extending Domain screen, when Progress shows 100%
    click Done to finish.

4.2 Task 2: Update Security Configuration for Oracle BI Mobile App Designer

This step executes a Python script to update your system JAZN file (system-jazn-data.xml) with the security grants required for BI Mobile App Designer. This step is required only the first time you apply the patch.
  1. Start WebLogic Administration server:
    • On Unix:
      Navigate to prod_mwhome/user_projects/domains/<domain_name>/bin
      Enter the following at the command prompt:
      ./startWebLogic.sh
    • On Windows:
      Navigate to prod_mwhome\user_projects\domains\<domain_name>\bin
      Enter the following at the command prompt:
      startWebLogic.cmd -start
  2. Run WLST script to enable integration with Oracle Fusion Middleware.
    • On Unix: Change directory to the install directory:
      cd prod_mwhome/Oracle_BI1/bifoundation/install
      Then enter:
      prod_mwhome/Oracle_BI1/common/bin/wlst.sh addMADCodeGrants.py t3://<hostname>:7001 <WebLogic administrator name>
      Example:
      prod_mwhome/Oracle_BI1/common/bin/wlst.sh addMADCodeGrants.py t3://myserver1:7001 weblogic
    • On Windows: Change directory to the install directory:
      cd c:\prod_mwhome\Oracle_BI1\bifoundation\install
      Then enter:
      prod_mwhome\Oracle_BI1\common\bin\wlst.cmd addMADCodeGrants.py t3://<hostname>:7001 <WebLogic administrator name>
      Example:
      prod_mwhome\Oracle_BI1\common\bin\wlst.cmd addMADCodeGrants.py t3://myserver1:7001 weblogic

4.3 Task 3: Enable BI Mobile App Designer in BI Presentation Services

Enable BI Mobile App Designer in the BI Presentation Services user interface by updating the BI Presentation Services instanceconfig.xml file.
  1. Open the configuration file instanceconfig.xml for editing. You can find instanceconfig.xml at:
    ORACLE_INSTANCE\config\OracleBIPresentationServicesComponent\coreapplication_obipsn
    For example:
    \instances\instance1\config\OracleBIPresentationServicesComponent\coreapplication_obips1
  2. Add the <EnableMAD> element to the file as shown in the following example:
    <ServerInstance>
        .....
         <AdvancedReporting>
             <EnableMAD>true</EnableMAD>
             ...
        </AdvancedReporting>
      </ServerInstance>
    
  3. Save the instanceconfig.xml file.

4.4 Task 4: Start Managed Servers and BI Components

Restart the managed servers and BI components:
  1. Start Managed Servers:
    • On Unix, navigate to
      prod_mwhome/user_projects/domains/<domain_name>/bin
      and enter the following at the command prompt:
      ./startManagedWebLogic.sh bi_server1
    • On Windows, navigate to
      prod_mwhome\user_projects\domains\<domain_name>\bin
      and enter the following at the command prompt:
      startManagedWebLogic.cmd bi_server1
  2. Start the BI system components by performing the following actions:
    • On Unix, navigate to
      prod_mwhome/instances/<instance>/bin
      and enter the following at the command prompt:
      ./opmnctl startall
    • On Windows, navigate to
      prod_mwhome\instances\<instance>\bin
      and enter the following at the command prompt:
      opmnctl startall

4.5 Task 5: Set Up the Apps Library

The Apps Library is where users view, manage, and subscribe to published apps from their mobile devices. From the administrator's perspective, the Apps Library is a folder in the catalog configured to act as the library.
Mobile App Designer also supports publishing apps to a configured Apps Library on a remote instance. For more information about the Apps Library including steps for setting up a remote Apps Library, see "Reference for Administrators" in the Oracle Fusion Middleware User's Guide for Oracle Business Intelligence Mobile App Designer.
Perform the following steps to set up an Apps Library on the local instance:

4.5.1 Create the Apps Library Folder in the Catalog

Create a folder in the catalog under Shared Folders to be the target folder for the Apps Library.
To create a folder in the catalog:
  1. Log in to Oracle Business Intelligence.
  2. On the Catalog page, select Shared Folders.
  3. In the catalog toolbar, click New and select Folder.
    Figure 1 Creating a New Folder
  4. Enter the folder name and click OK, as shown in Figure 1.
    Figure 2 Entering the Name for the Apps Library Folder in the Catalog
  5. Set Permissions on the Apps Library folder. App designers that will be publishing apps to the folder must have Write permissions. App consumers that will be viewing apps in the library must have Read permissions.

4.5.2 Set Up the Configuration File

To register the folder in the catalog to act as the Apps Library, add a property entry to the xmlp-server-config.xml configuration file.
To set up the configuration file:
  1. Open the xmlp-server-config.xml file. It is located under <DOMAIN_HOME>/config/bipublisher/repository/Admin/Configuration.
  2. Add the following property to xmlp-server-config.xml:
    Property: APPS_LIBRARY_FOLDER_LOCAL
    Description: Specifies the folder in the catalog to act as the Apps Library. Enter the path to the folder under Shared Folders that you created in the previous step (do not include "Shared Folders" in the path).
    Sample Configuration File Entry:
    <property name="APPS_LIBRARY_FOLDER_LOCAL" value="/Apps Library"/>
  3. Restart the bimad (BI Mobile App Designer) application from the WebLogic Server Administration Console.

5 Validating the Install

To validate the install, log in to Oracle Business Intelligence: http://<hostname>:<port_number>/analytics
On the home page, verify that Mobile Application is an option from the Create menu.


Thanks
Saleem Syed(SS)